Introduction
Hello outdoor enthusiasts!
Over the last 10 years, outdoor activities have gained popularity and more specifically, kayaking. A kayak is not just a great fitness tool, but also a great way to explore the Great Outdoors. Over the years, more and more people began kayak fishing and visiting different campsites with their vessels. Undoubtedly, it did not take long to recognize that kayaking offers ample health benefits, and it is a great alternative to classic activities like jogging.

Do I need a Storage Kayak Rack?
Unquestionably, a kayak will open up a new world, but the only tricky issue is that you cannot just drop your ‘yak in your garage, especially if you do not have enough space. It goes without saying that if you have an inflatable vessel, you can stash it nearly anywhere.
Many people store their kayaks outside, which is not a good idea. Mold, rain, dust, and UV rays can destroy your vessel within 3 years. A good solution would be a kayak rack where you can place it and keep it safe and sound in your garage or backyard under an overhang.
If you have a hard-shell kayak and a little storage problem, you came to the right place. Fortunately, you do not have to spend a fortune on expensive kayak racks because we will show you how to build a kayak rack!
Vertical Kayak Stand
First, if you have a small garage, the only option to store your kayak is upright. Of course, you can just lean it against the wall, but you will need something that will hold it. This wood kayak stand construction will support one-person and small tandem kayaks.
Rule number one: Before you start constructing a vertical stand, you will have to make sure that your ceiling is high enough to store the kayak upright. Lean your kayak against the wall and mark the width of your vessel on the wall at the point you would like to place the rack.
THINGS YOU WILL NEED
- • One 2×4 wooden plank (length depends on your kayak)
- • Two metal or galvanized brackets “floating shelf” brackets
- • Screws
- • Foam pipe wrap
- • Two plastic caps
- • Lashing straps
Firstly, you will have to screw the two brackets on each end of your plank. Secondly, wrap the brackets with the foam insulation and put on the plastic caps on your bracket ends. That’s it! Now the last step is to attach the plank on your wall according to your kayak height. Use the lashing straps to fasten your vessel.
PVC Kayak Stand Rack
When you own a long kayak and you want to protect it from harsh weather conditions, you may consider a kayak stand. The biggest benefit of a stand is that it can hold heavier kayaks, and you can adjust it according to your needs. It is a good option for both sit-in and sit-on-top kayaks.
The rigid construction of this stand requires PVC tubes and some connectors. Before you select the PVC tubes, please make sure that they are flat without any visible cracks.
THINGS YOU WILL NEED
- • One small hand saw
- • 2 10’feet PVC Tubes — 2” inches Diameter
- • 2 “X” PVC Connectors
- • 2 “T” Connectors
- • 8 2” inches PVC or plastic caps
- • PVC Solving Cement
- • Lashing strap
STEP 1
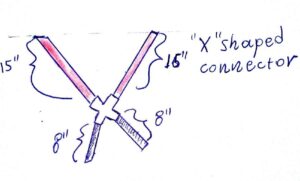
Now you will have to cut the tubing into pieces. Hence, you will need
- • 15” inches 4 pieces
- • 8” inches 8 pieces
- • 5’feet 2 pieces
STEP 2
The next step will be to clean your “X” connectors properly, so you can apply the PVC cement. For a better result, we would recommend to sand off the PVC tubes so they are completely flat. Apply some cement in the “X” connector and slide in the PVC tubes like in the picture below.
STEP 3
You should be very careful with PVC cement because it dries quickly. The next step will be to attach the “T” shaped connectors at the 8” inches tubes you have just used and slide the other two 8” pieces as well in the connectors.
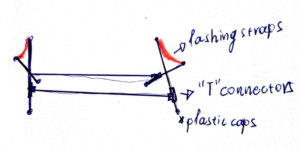
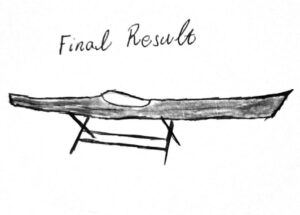
Make sure that everything is perfectly aligned before you apply PVC cement. Please look at the picture below. Lastly, you should put the plastic caps at the end of the base tube. The final result should look like in the picture. Now you can slide in the open “T” connectors the long tubes and glue them as well.
STEP 4
The lashing straps should support your kayak hull, so you will have to cut two pieces that are a bit longer than the “V” shaped opening. Apply some PVC cement, put the straps on the top, and close the end with a plastic cap. You can see the final result in the picture.
Let’s Explore the Great Outdoors
Finally, kayaking is a great activity, and the size of your kayak should not stop you from enjoying a nice kayak trip. Undoubtedly, they are not the smallest boats, but if you have the ideal storage rack at home, you will not face any problems. You can find different kayak racks on the market, but if you would like something inexpensive, you can just construct your DIY wood kayak rack.
In this post, we included two kayak storage methods, and you will have to choose according to your available space and vessel. The average kayak size ranges between 7-13 feet, and we would recommend the vertical stand. However, if you have a fishing kayak, or an ocean fishing kayak, which are usually longer vessels, you should choose the PVC stand.
Would you like to cast a fly in the river or enjoy the scenic mountaintops and crystal-clear rivers? Grab your kayak and hit the road!
Author: Stavros Steve Alexiou
Born and raised in the heart of Anchorage. As an avid outdoor enthusiast, nature inspires me and I love to seek out isolated places, picturesque mountains, and crystal clear rivers, and I spend most of my time kayak fishing, fly-fishing, hiking, and backpacking with a group of friends. My motto? Stay motivated people, and grab any opportunity to reconnect with nature!